Following up on our initial project, Building a Smarter Fan Controller for Your Rack, we’re taking it a step further by adding a web interface. This will allow us to display the current temperature, as well as the on and off threshold temperatures, making it easier to monitor and view the current configuration of our fan controller setup.
To start, we need to set up the ESP8266 to run a simple web server that will display the current temperature and threshold values. Here’s the updated code with the WiFi credentials defined at the top:
#include <ESP8266WiFi.h>
#include <ESP8266WebServer.h>
#include <DHT.h>
#define DHTPIN 2 // GPIO2 corresponds to D4 on the ESP8266
#define DHTTYPE DHT11 // Define the sensor type
#define RELAY_PIN 5 // GPIO5 corresponds to D1 on the ESP8266
const char* ssid = "YOUR SSID";
const char* password = "YOUR WIFI PASSWORD";
DHT dht(DHTPIN, DHTTYPE);
ESP8266WebServer server(80);
bool fanOn = false;
const float ON_THRESHOLD = 30.0; // Temperature to turn the fan on
const float OFF_THRESHOLD = 25.0; // Temperature to turn the fan off
void handleRoot() {
float temp = dht.readTemperature();
String html = "<html><head><meta charset=\"UTF-8\"></head><body><h1>Fan Controller</h1>";
html += "<p>Current Temperature: " + String(temp) + " °C</p>";
html += "<p>On Threshold: " + String(ON_THRESHOLD) + " °C</p>";
html += "<p>Off Threshold: " + String(OFF_THRESHOLD) + " °C</p>";
html += "</body></html>";
server.send(200, "text/html", html);
}
void setup() {
Serial.begin(115200);
pinMode(RELAY_PIN, OUTPUT);
digitalWrite(RELAY_PIN, LOW); // Ensure the fan is initially off
dht.begin();
WiFi.begin(ssid, password);
while (WiFi.status() != WL_CONNECTED) {
delay(1000);
Serial.println("Connecting to WiFi...");
}
Serial.println("Connected to WiFi");
server.on("/", handleRoot);
server.begin();
Serial.println("HTTP server started");
Serial.print("IP Address: ");
Serial.println(WiFi.localIP());
}
void loop() {
server.handleClient();
float temp = dht.readTemperature();
if (isnan(temp)) {
Serial.println("Failed to read from DHT sensor!");
return;
}
Serial.print("Temperature: ");
Serial.println(temp);
if (!fanOn && temp > ON_THRESHOLD) {
digitalWrite(RELAY_PIN, HIGH); // Turn on the fan
fanOn = true;
Serial.println("Fan turned ON");
} else if (fanOn && temp < OFF_THRESHOLD) {
digitalWrite(RELAY_PIN, LOW); // Turn off the fan
fanOn = false;
Serial.println("Fan turned OFF");
}
delay(2000); // Wait a bit between readings
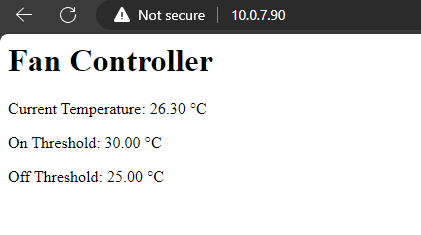
}Once you upload the sketch and the ESP8266 is connected to WiFi, the website will start. You can then access the web interface by typing the ESP8266’s IP address into a web browser. This will display the current temperature and the on and off threshold temperatures. You can use the serial monitor to grab the IP address of the board, either wise you’ll have to get the IP address from your router / DHCP server.
With the web interface up and running, monitoring your fan controller has become even easier. Now, you can view the temperature data from any device on your network, making adjustments as needed.
This enhancement not only improves usability but also makes your DIY controller more versatile and user-friendly.
2 comments on “Enhancing Your Fan Controller: Adding a Web Interface”