Setting up network storage in Proxmox seems straightforward. Add an SMB share, point it to your NAS, and boom – instant access to your ISOs, right? That was the plan at least. My first instinct was to do it the way I know how… the “Linux way”, mounting everything via the command line. But after a little digging, I realized Proxmox actually has a GUI option for this, making life much easier. Or so I thought…

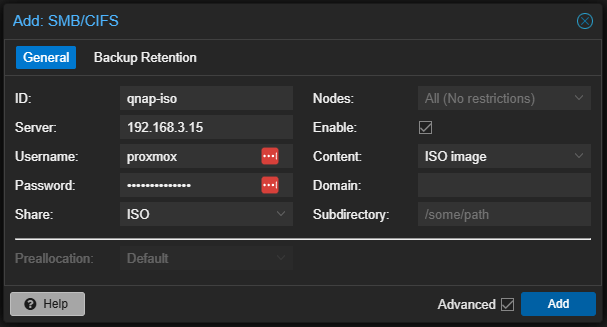
Adding SMB storage in Proxmox is simple enough. Head over to Datacenter → Storage, click Add, and select SMB/CIFS. Enter your NAS details:
- ID: A friendly name (e.g.,
qnap-iso). - Server: Your NAS IP (e.g.,
192.168.3.15). - Username & Password: Credentials for the NAS user with read/write access.
- Share: The SMB share name (e.g.,
ISO). This becomes selectable with correct credentials with access to the NAS. - Content: Select ISO Images (unless you are using your SMB share for other features, like VM Disks).

Once saved, Proxmox mounts the share at /mnt/pve/qnap-iso/, and everything should work. Should. But when I checked the Proxmox GUI, my ISOs were nowhere to be found.
Where Did My ISOs Go?
Everything looked fine at first glance. A quick ls -l /mnt/pve/qnap-iso/ in the shell confirmed the ISOs were sitting right there.

The problem? Proxmox was ignoring them. That’s because Proxmox is picky – it only recognizes ISOs if they live inside template/iso/ within the mounted share. But my NAS setup is shared across multiple systems and restructuring everything just for Proxmox wasn’t an option.
First Attempt: Symlinks (Spoiler: It Didn’t Work)
My first thought? Just use a symbolic link. It’s a simple way to redirect files without moving them. A quick ln -s /mnt/pve/qnap-iso/*.iso /mnt/pve/qnap-iso/template/iso/ should have solved everything. But no, SMB laughed in my face with a File Exists error or Input/output error. After a bit of reading, it turns out SMB doesn’t support symlinks properly across mounts. So much for that idea.

The Fix: Bind Mounts
Since symlinks were a dead end, I turned to bind mounts. These are like symlinks but at the filesystem level, making directories appear elsewhere without actually moving them. Perfect for tricking Proxmox into seeing ISOs where it expects them.
To set this up, I added a line to /etc/fstab.
First we need to open /etc/fstab:
nano /etc/fstabThen we add the following line (replacing qnap-iso with your own share name):
/mnt/pve/qnap-iso /mnt/pve/qnap-iso/template/iso none bind 0 0CTRL-X to save, Y to overwrite and exit nano.
A quick reload with:
systemctl daemon-reload
mount -a
And just like that, running ls /mnt/pve/qnap-iso/template/iso/ finally showed my ISOs where Proxmox wanted them.
Refreshing Proxmox
Proxmox caches storage information, so I had to nudge it to recognize the change:
systemctl restart pvestatdA quick trip back to the web interface, and there they were! ISOs now visible under qnap-iso → ISO Images.

Hands-Free ISO Management
Now, every time I drop a new ISO into the NAS, Proxmox detects it automatically. No more manual copying, no wasted storage… just seamless access to my ISOs exactly where I need them.
Proxmox enforces a rigid directory structure for ISOs, but you don’t need to rearrange your entire NAS just to fit its expectations. Symlinks won’t work with SMB, but bind mounts will. Once configured, this setup requires zero maintenance – new ISOs appear in Proxmox automatically. Now that everything is working as it should, I can focus on spinning up VMs without worrying about missing ISOs. Hopefully, this saves someone else the short headache I went through!


Good post.