I’ve been writing PHP for over 20 years. Built tools, automated workflows, scraped APIs… the usual. I’ve used Discord here and there, but I’d never set up my own server. Never touched the Developer Portal. Never built a bot. So when I decided to build a Discord bot with PHP for personal health tracking, the first step wasn’t writing code. It was figuring out the whole server and bot infrastructure from scratch.
Here’s why Discord made sense. It runs everywhere. Phone, tablet, desktop, browser. The same conversation follows you around. I already had the health data side sorted out (I’ve been wearing a Garmin Epix Gen 2 daily for close to two years now), but I needed a front-end that didn’t require building a whole app. Discord is that front-end. I’m already in it throughout the day anyway, so why not make it work for me?
The end goal? A health companion I can talk to in plain English. Tell it what I ate for lunch, how long I ran, and have it track everything… then hold me accountable when I’ve been slacking for three days straight. But before any of that could happen, I needed to set up my own Discord server and get PHP talking to it.
Discord Servers: The Part I’d Never Done
I’d joined other people’s servers before, but I’d never created one. Turns out the admin side of Discord is a completely different experience from just lurking in someone else’s channels. A “server” is basically a private workspace. Think Slack, but with more flexibility and no per-user pricing. Inside a server you’ve got channels (chat rooms organized by topic), categories (folders that group channels), and roles (permissions for who can do what).
For this project, the important bit is: you create a server, you add a channel or two, and your bot talks in them. That’s it.
Creating Your First Discord Server
This part is almost embarrassingly simple.
- Click the big “+” button on the left sidebar (you’ve probably seen it but never clicked it)
- Select “Create My Own” then “For me and my friends”
- Name it whatever you want (I went with “Mission Control” because this server isn’t just for one project… it’s where I’ll run everything I build)
Done. You’ve got a server. It comes with a default #general channel and not much else.
Keep It Simple: One Channel
My first instinct was to create a bunch of separate channels. One for food logging, one for exercise, one for daily summaries, one for testing. Then I thought about how I’d actually use this thing day to day.
I’m going to be texting this bot from my phone while I’m out, or from my desk between tasks. I don’t want to think about which channel to type in. I just want to say “had a burrito for lunch” or “ran 30 minutes” and have the bot figure out what I mean. That’s the whole point.
So I kept it to two channels:
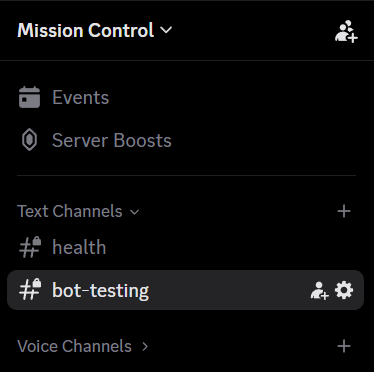
- #health for all bot interaction… food, exercise, summaries, everything. One conversation, one place.
- #bot-testing for development and breaking things without cluttering the real channel.
That’s it. The bot’s job is to be smart about context, not to make me organize my own messages into categories. KISS.
The Developer Portal: Registering Your PHP Discord Bot
Here’s where it gets interesting. To build a Discord bot with PHP, you need to register an “application” through Discord’s Developer Portal. This is how Discord knows your bot exists and what it’s allowed to do.
Head to the Discord Developer Portal and click “New Application.” Name it (I chose “Health Companion”), agree to the terms, and click Create.
You’ll land on a dashboard with a bunch of tabs. If you’ve seen older tutorials that say “click Add Bot and confirm”… that’s outdated. Discord now creates a bot user automatically when you create the application. The Bot tab is already populated and ready to configure.
Here’s the setup, and the order matters.
Step 1: Lock It Down (Installation Tab)
Go to the Installation tab first. This controls who can add your bot to servers.
- Disable User Install (you don’t need this for a personal server bot)
- Keep Guild Install enabled
- Set the Install Link to None
Save. This step has to happen before you make the bot private, otherwise Discord throws an error about private applications not being allowed to have a default authorization link. Took me a few minutes of confused clicking to figure that out.
Step 2: Configure the Bot (Bot Tab)
Now go to the Bot tab. A few things to set here:
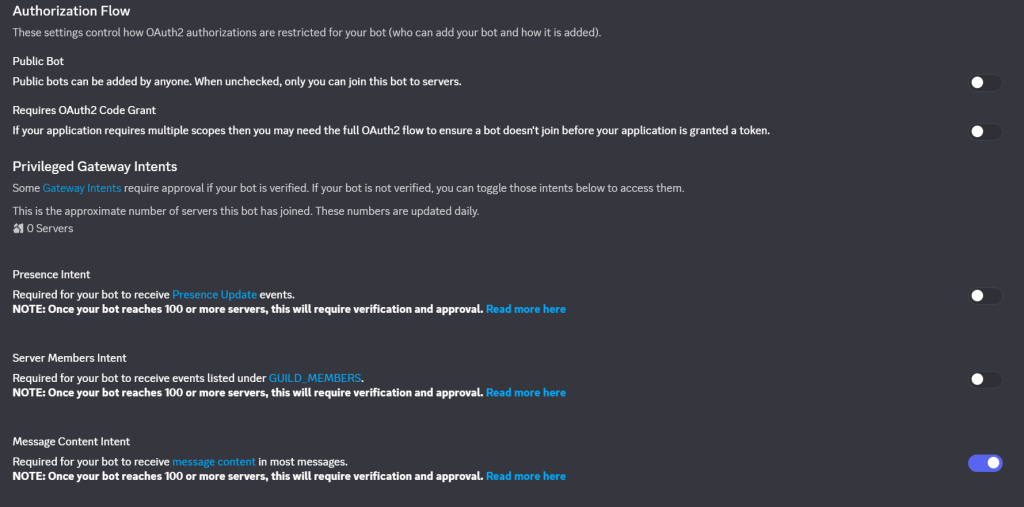
Public Bot — Turn this OFF. With the Install Link already set to None, this will save without errors now. A private bot means only you (the application owner) can invite it to servers. Since this bot is going to handle my personal health data, I don’t want anyone else able to add it somewhere.
Token — Click “Reset Token” and copy what it gives you. This is your bot’s password. It’s only shown once… if you lose it, you’ll need to reset it again. Store it in a .env file, never in your code. More on this in a second.
Privileged Gateway Intents — Scroll down and you’ll see three toggles. For now, enable Message Content Intent. This is the one that lets your bot actually read what people type in a channel. Without it, your bot receives message events but the content field comes back empty. Since the whole point of this project is chatting with the bot in plain text, this one’s non-negotiable.
The other two (Presence Intent and Server Members Intent) you can leave off for now. We don’t need to know who’s online or track member join/leave events.
Step 3: Invite the Bot to Your Server (OAuth2 Tab)
Even though the bot is private with no install link, you can still invite it to your own server through the OAuth2 → URL Generator.
- Under Scopes, check
botandapplications.commands - Under Bot Permissions, select: Send Messages, Read Message History, View Channels, and Embed Links
- Copy the generated URL at the bottom
Open that URL in your browser, pick your Mission Control server from the dropdown, and authorize it. Your bot shows up in the member list. Offline for now, since there’s no code running yet. But it’s there.
A Quick Note on Security
This bot is going to know what I eat, how I sleep, and when I’m slacking on exercise. That’s personal data. So a few things I did from the start:
- Private bot so nobody else can invite it anywhere
- Token stored in a
.envfile, not in source code. Add.envto your.gitignoreimmediately. - 2FA enabled on my Discord account because the bot is only as secure as the account that owns it
- Minimum permissions only. No Administrator checkbox. Just the four permissions the bot actually needs right now. You can always add more later.
If your token ever leaks (accidentally committed to Git, pasted somewhere public), go to the Bot tab and hit Reset Token immediately. Bots scrape public repos for Discord tokens and can compromise your bot in seconds. Don’t learn this the hard way.
Bot vs Webhook: What Does Your PHP Discord Bot Need?
If you’re a developer, you already know what a webhook is. But Discord uses both webhooks and bots, and they serve different purposes here.
A webhook is one-way. Your PHP script pushes a message TO a Discord channel. You hit a URL with a JSON payload and a message appears. Runs from any standard PHP hosting or a cron job. No daemon, no persistent process.
A bot is two-way. It sends messages AND listens for them. It can respond to commands, react to what you type, and actually hold a conversation. But it needs to stay running as a long-lived process, which is a different architecture than typical PHP request/response.
For what I’m building (a companion I can actually chat with about food and exercise), I’ll eventually need the full bot. But for this first post? Webhooks get PHP talking to Discord with the least amount of moving parts. Prove the concept, then add complexity.
Build a Discord Bot with PHP: Your First Webhook Message
Here’s the fun part. No Composer packages. No frameworks. Just PHP and cURL.
First, create a webhook for #bot-testing. Right-click the channel in Discord, go to Edit Channel → Integrations → Webhooks → New Webhook. Copy the webhook URL. It’ll look something like https://discord.com/api/webhooks/123456/abcdef.
Now create a PHP file called send_message.php:
<?php

$webhookUrl = 'YOUR_WEBHOOK_URL_HERE';

$message = [
    'content'  => 'Hello from PHP! The health bot lives.',
    'username' => 'Health Companion',
];

$ch = curl_init($webhookUrl);
curl_setopt($ch, CURLOPT_POST, true);
curl_setopt($ch, CURLOPT_HTTPHEADER, ['Content-Type: application/json']);
curl_setopt($ch, CURLOPT_POSTFIELDS, json_encode($message));
curl_setopt($ch, CURLOPT_RETURNTRANSFER, true);

$response = curl_exec($ch);
$httpCode = curl_getinfo($ch, CURLINFO_HTTP_CODE);
curl_close($ch);

if ($httpCode === 204) {
    echo "Message sent!\n";
} else {
    echo "Something went wrong. HTTP $httpCode\n";
    echo $response . "\n";
}
Run it from the terminal: php send_message.php
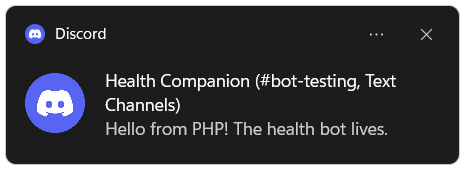
Check your Discord. There it is. Your first message from PHP sitting in the channel.
I’m not going to lie… seeing that message notification appear in my own server from my own PHP script was oddly satisfying. Like the first time you get “Hello World” to print, except you’re an adult with a mortgage.
Making It Look Good With Rich Embeds
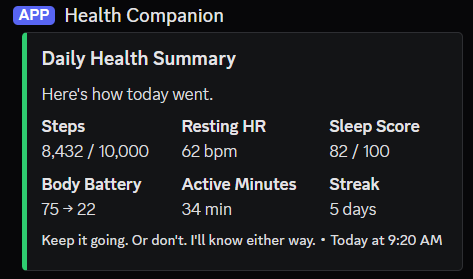
Plain text works, but Discord supports rich embeds with colors, fields, footers, and timestamps. This is how you’ll eventually display health summaries that actually look good. Here’s what a daily report could look like:
<?php

$webhookUrl = 'YOUR_WEBHOOK_URL_HERE';

$embed = [
    'title'       => 'Daily Health Summary',
    'description' => 'Here\'s how today went.',
    'color'       => 0x2ECC71, // Green for a good day
    'fields'      => [
        ['name' => 'Steps',          'value' => '8,432 / 10,000', 'inline' => true],
        ['name' => 'Resting HR',     'value' => '62 bpm',         'inline' => true],
        ['name' => 'Sleep Score',    'value' => '82 / 100',       'inline' => true],
        ['name' => 'Body Battery',   'value' => '75 → 22',        'inline' => true],
        ['name' => 'Active Minutes', 'value' => '34 min',         'inline' => true],
        ['name' => 'Streak',         'value' => '5 days',         'inline' => true],
    ],
    'footer'    => ['text' => 'Keep it going. Or don\'t. I\'ll know either way.'],
    'timestamp' => date('c'),
];

$payload = [
    'username' => 'Health Companion',
    'embeds'   => [$embed],
];

$ch = curl_init($webhookUrl);
curl_setopt($ch, CURLOPT_POST, true);
curl_setopt($ch, CURLOPT_HTTPHEADER, ['Content-Type: application/json']);
curl_setopt($ch, CURLOPT_POSTFIELDS, json_encode($payload));
curl_setopt($ch, CURLOPT_RETURNTRANSFER, true);

curl_exec($ch);
curl_close($ch);
That renders as a formatted card in Discord with color-coded fields. The hex color controls the accent stripe on the left: 0x2ECC71 for green (good day), 0xE74C3C for red (we need to talk), 0xF39C12 for yellow (meh). You can conditionally set the color based on how the health data looks that day.
What’s Coming Next
Right now I can push messages from PHP to Discord. That’s the foundation. But the real project is a two-way conversation. I want to text this thing “had a chicken salad for lunch” and have it log the nutritional data. I want to say “went for a 30 minute run” and have it ask me what kind of run (because apparently that matters for calorie calculations).
Most importantly, I want it to tell me to get my ass up out of the chair because I’ve been sitting too long.
For all of that, I need actual health data to work with. And that means pulling it from Garmin Connect… which, spoiler, Garmin doesn’t make easy. At all. That’s Part 2.
If you’re following along, get comfortable with webhooks first. Send a few test messages. Play with embed colors and field layouts. The Discord Webhook Documentation has the full embed spec if you want to get creative with it.
I’ve been building automation tools like my ESPHome-powered smart plug watchdog for a while, and this project has that same energy. Start simple. Prove the concept works. Then layer on the complexity. It’s the same approach I take with every project and it hasn’t let me down yet.
Next up: getting your health data out of Garmin Connect with PHP. Bring your patience.